Recipes

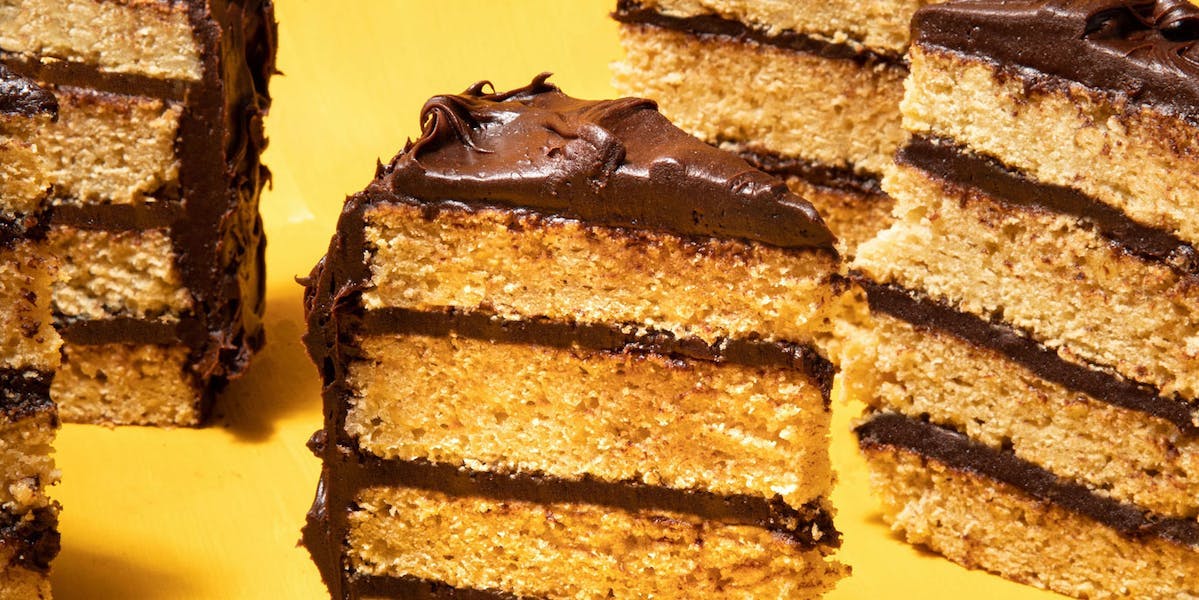
Vegan Birthday Cake
8min read
We recently asked our Instagram community if they’d ever struggled with being 100% plant-based. It turned out the answer was yes. So much yes. And it inspired us to turn your fess ups into tasty recipes, but no judgement if the pans stay in the cupboard.
This birthday cake recipe was inspired by Louise. When she told us “birthday cakes always get me”, we knew our next mission would have to be just that, a classic yet fully plant based birthday cake. Don’t feel like you need to wait for the next birthday though, we very much recommend making this for yourself and then eating it in your pjs, like we did. Grab the recipe for your very own BYOB (birthday cake).
Four layers of cake can be intimidating, at least to me. As more of a cookie baking person than a cake baking person, the thought of trying to perfectly frost four layers of cake felt like a disaster waiting to happen. I’m not a very precise person and I like mess - which aren’t great attributes for cake baking. Having now done it though, I can confirm the idea is a lot more stressful than the actual process. I’ve tried to outline the process in the clearest way possible and using the bare minimum tools - which is an offset spatula, but if you don’t have one, you can simply use a spoon or a butter knife.
I’d say the most important thing is to try to not cut corners, which I usually do. Letting the cake chill in the fridge when instructed makes it infinitely easier to work with and helps it keep its shape, which is helpful if you don’t have the steadiest hands. I also feel like there’s nothing that frosting can’t fix: use it to fill in gaps, cracks or holes if they appear and remember, you can just scoop some off and try again if it’s not working out.
Oh, and if you simply don't want to bake or frost four layers, you're very welcome to make this into a two layer cake instead. Follow the same instructions, just don't split the cake bases in step 8.
Prep Time
60 mins
Cook Time
30 mins
Serves
8-10
Ingredients
Sponge:
560g plain flour
280g caster sugar
½ tsp salt
½ tsp baking soda
2 tsp baking powder
550ml plant based milk, at room temp
180ml neutral oil
1 tbsp apple cider vinegar
2 tsp vanilla extract
Chocolate Frosting:
200g plant based butter, at room temp
500g icing sugar
50g cocoa powder
1 tsp vanilla extract
2 tbsp plant based milk
¼ tsp salt
Method
STEP 1
Preheat the oven to 165˚C fan (or 185˚C conventional). Grease and line your cake tins - you can use two (18cm) cake tins or four (18cm) cake tins if you have them.
STEP 2
In a large bowl, combine the flour, sugar, salt, baking soda and baking powder. Whisk to combine and set aside.
STEP 3
In a separate bowl, whisk together the milk, oil, apple cider vinegar and vanilla extract. Pour the wet ingredients into the dry, and stir to combine.
STEP 4
Divide the batter amongst the two (or four) tins. If baking in two tins, bake the cakes for 30-35 mins, until a toothpick inserted in the center comes out clean. If baking in four tins, bake the cakes for 25 minutes. Let the cakes cool for 10 minutes, then remove them from their tins. Let them cool completely.
STEP 5
While the cakes cool, prepare the buttercream frosting. Add the butter to a large bowl and use an electric mixer (or stand mixer) to beat the butter for 2-3 minutes until fluffy and lighter in colour.
STEP 6
Fold in 200g of icing sugar as well as the cocoa powder, salt, vanilla extract and milk. Beat the mixture with the electric mixer for 1-2 minutes, then fold in the remaining icing sugar. Beat the mixture until it’s creamy and fluffy (2-3 minutes).
STEP 7
If the frosting feels too stiff, add an extra tbsp of milk and mix for 30 seconds. If it feels too loose, add 2 extra tbsp of icing sugar and mix for another 30 seconds. The frosting should be easily spreadable, but should hold its shape.
STEP 8
Once the cakes have cooled, it’s time to assemble. If you used two cake tins, use a serrated knife or a cake slicer to split the two sponges into four. You can also leave them as is, if you’re after a two layer cake.
STEP 9
Place a dollop of frosting onto the base of your cake stand or dish. Place the first layer of cake on. Dollop 2 heaped spoons of frosting on and use an offset spatula or spoon to spread the frosting along the top of the cake, all the way to the edges (don’t worry if it gets on the exterior - it will all be frosted at the end). Try to spread the frosting as evenly as possible.
STEP 10
Place the second layer of sponge onto the froster first layer. Dollop 2 heaped spoons of frosting on and spread it like you did with the first layer. Repeat the process with layers 3 and 4.
STEP 11
Now that the layers are frosted between them and on the top, it’s time to do a crumb coat (a base coat) of frosting - this is a light layer of frosting along the whole cake that helps seal the sponge in and makes it easier to decorate the cake later on.
STEP 12
Spoon some frosting along the sides of your cake. Use an offset spatula to spread the frosting in a thin layer across the cake - you want as little excess frosting as possible.
STEP 13
If you have a bench scraper, place it where it’s just touching the edge of the cake and turning the cake dish, to get a smooth and uniform finish along the cake sides. If you don’t have a bench scraper, use a knife to remove as much excess frosting as possible.
STEP 14
Pop the cake in the fridge for 20 minutes to firm up - this makes it easier to put the final layer of frosting on.
STEP 15
Remove the chilled cake from the fridge. Dollop the remaining frosting along the top and sides of the cake, and use the back of a spoon to create little swooshes all over the cake - messy works here!
STEP 16
Place the cake back in the fridge for 10 minutes to firm up slightly. Remove the cake from the fridge and slice it up!
Confessions are in session, submit them here and we'll pop a Treat in your next allplants order. We might just make your story into a recipe, too!
By Valentina Concordia

Valentina is our Food Editor, who dreams up our tasty dishes and recipes for our social channels. She has loads of experience cooking up a storm in Italian kitchens, so it’s no surprise she can’t live without good-quality olive oil (don’t come between her and her olive oil) and fresh pasta.
Let us take care of dinner
After getting creative in the kitchen, give yourself the weekend off by letting us take care of dinner. Check out our delicious meals here.
Shop now


. })